Instagram Highlights: Everything You Need to Know
Scroll to the top of almost any well-run Instagram profile and you’ll see a row of small circles sitting just under the bio. Those are called Instagram Highlights, and they do more heavy lifting for a brand’s first impression than most people give them credit for. A new visitor lands on your profile, and before they ever scroll your grid, those circles tell them who you are, what you sell, and whether you’re worth following. This guide covers everything from the basics of creating one to the workaround most tutorials fumble: adding content to Highlights of instagram without ever posting it to your Story.
What Are Instagram Highlights?
Instagram Highlights let you take Stories you’ve already posted and pin them permanently to your profile, organized into labeled collections that sit just below your bio. Regular Stories disappear after 24 hours by design. Highlights are the exception: once a Story is added to one, it stays visible on your profile indefinitely, or until you remove it yourself.
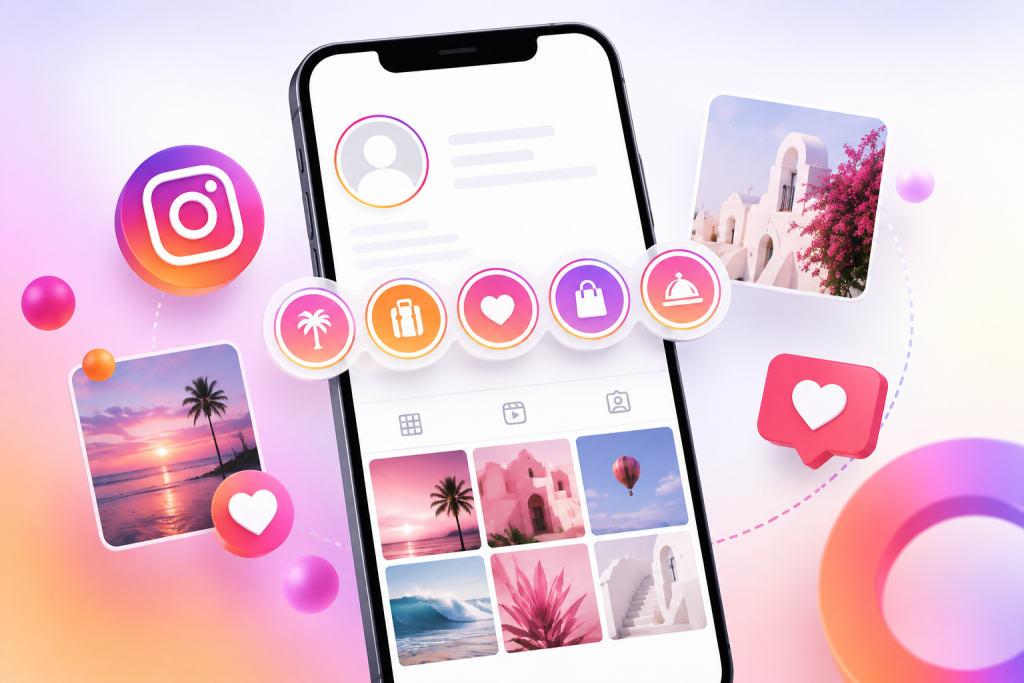
Functionally, a Highlight is just a saved, curated group of past Stories with a title and a custom cover image. But the effect is closer to a mini homepage for your profile: a new visitor can tap through a “Reviews” Highlight, a “How It Works” Highlight, or a “Behind the Scenes” Highlight without ever needing to scroll your grid or wait for you to post something new.
FYI- You can automatically embed Instagram feed on website using an Instagram widget with a social media aggregator, bringing your website to life with fresh content.

Instagram
Hashtag

Instagram
Handle

Instagram
Stories

Instagram
Reels

Instagram
Mentions & Tag
Why Highlights Matter for Your Profile
Instagram Highlights help you organize your best Instagram Stories, showcase important information, build credibility, and give new visitors a quick introduction to your brand or personal profile.
1. Make a Strong First Impression
They’re the first thing a new visitor actually engages with. Someone landing on your profile for the first time is far more likely to tap a Highlight than scroll your entire feed. It’s the fastest way to hand a stranger a curated introduction to your brand or personal content.
2. Organize Your Instagram Stories
Stories vanish after a day, but the best of them, a product demo, a customer testimonial, an FAQ, deserve a longer shelf life. Highlights give that content a permanent home instead of letting it disappear.
3. Build Credibility With Social Proof
A profile with a “Reviews” or “Testimonials” Highlight visibly signals social proof before a visitor has to dig for it anywhere else.
4. Answer Common Questions Easily
An FAQ-style Highlight answering common questions (shipping times, booking process, pricing) cuts down on the same DMs arriving over and over.
How to Create Instagram Highlights: Different Methods
There isn’t just one way to build a Highlight. Depending on whether you’re working from a Story you just posted, older archived content, or your profile directly, one of these four approaches will fit.
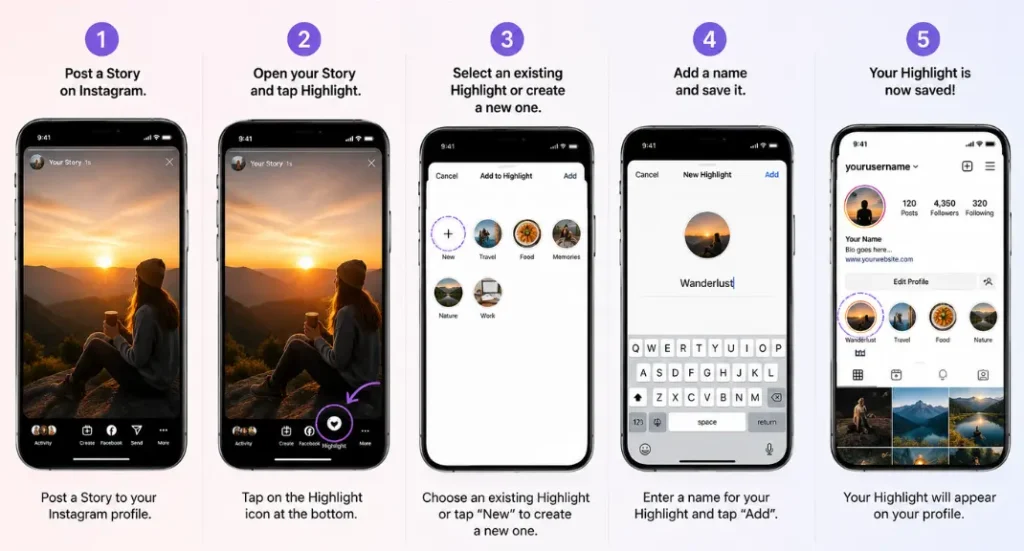
- Create a Highlight from an Active Story
- Post a Story on Instagram.
- Open your Story and tap Highlight.
- Select an existing Highlight or create a new one.
- Add a name and save it.
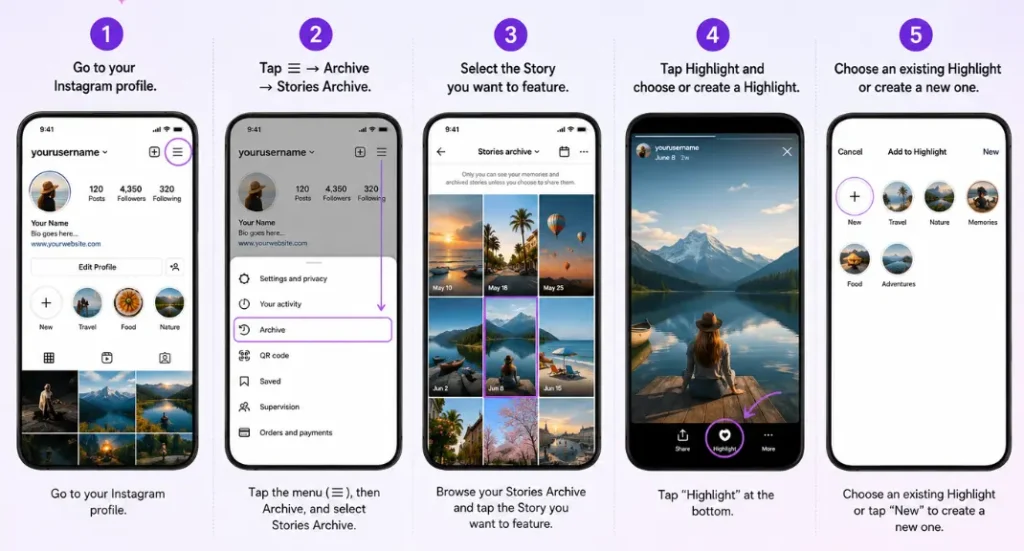
2. Create a Highlight from Archived Stories
- Go to your Instagram profile.
- Tap ☰ → Archive → Stories Archive.
- Select the Story you want to feature.
- Tap Highlight and choose or create a Highlight.
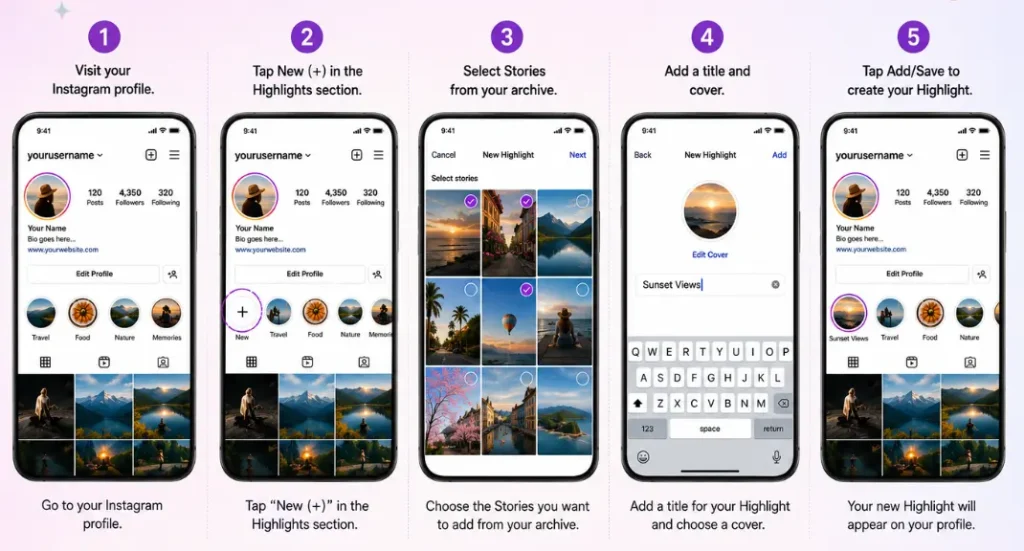
3. Create a Highlight Directly from Your Profile
- Visit your Instagram profile.
- Tap New (+) in the Highlights section.
- Select Stories from your archive.
- Add a title and cover, then save.
4. Add New Stories to an Existing Highlight
- Open your profile.
- Tap and hold the Highlight.
- Select Edit Highlight.
- Choose additional Stories and tap Done.
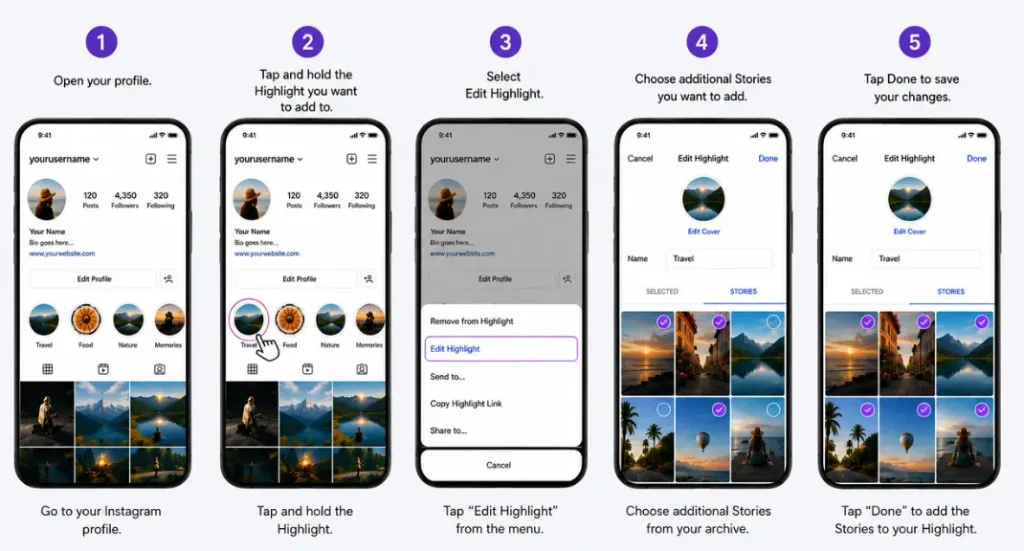
Which method makes sense depends on your workflow: the first is fastest right after posting, the second and third are best for pulling in older content you never highlighted at the time, and the fourth is what you’ll use most often once your Highlight categories are already set up and you’re just keeping them current.
How to Add Highlights on Instagram
- Go to your profile and tap the “New” circle at the start of your Highlights row, just below your bio.
- Select from your Story Archive. A menu will show your previously posted Stories. Choose the ones you want grouped into this Highlight.
- Name the Highlight. Tap “Next” once you’ve made your selections, then give it a clear, short title, ideally something a new visitor would immediately understand, like “Reviews” or “FAQ” rather than something vague.
- Choose or upload a cover image. You can select a frame from one of the Stories you added, or upload a custom image from your camera roll for a more polished, on-brand cover.
- Tap “Add” to finish. The new Highlight appears immediately on your profile, and you can add more Stories to it later at any time.
To add more content to an existing Highlight later, tap into it, hit the three-dot menu, choose “Edit Highlight,” and select “Stories” to pull in additional archived content.
Display Your Instagram Feed Anywhere
Embed your Instagram feed on any website without coding in just a few minutes.
Create Your WidgetHow to Add Highlights on Instagram Without Adding to Your Story
This is the part most people searching for Instagram Highlights actually want to know, and it’s worth being upfront: Instagram doesn’t currently offer a direct “upload straight to Highlights” option. Every method for getting content into a Highlight without your followers seeing it as a live Story works around that limitation using privacy settings rather than a built-in feature. A few workarounds cover most situations. If you’re using Highlights to make your profile more engaging and attract new visitors, it’s also worth focusing on strategies that can help you get more followers on Instagram. A few workarounds cover most situations.
Method 1: Post to Story, then hide it from everyone
- Open your Story privacy settings (Settings > Privacy > Story) and add everyone, or your entire follower list, to the “Hide story from” list.
- Post the content as a normal Story. Because everyone is on the hidden list, none of your followers will see it appear.
- Once it’s posted, it’s automatically saved to your Story Archive, the same place Instagram pulls content from when building a Highlight.
- Add it to a Highlight as usual, then remove the temporary privacy restriction once you’re done.
This is the most reliable method, but it’s worth double-checking your hidden list afterward. Leaving your Story hidden from everyone by accident means future Stories won’t show up for your audience either.
Method 2: Post to Close Friends only, then don’t add anyone
Sharing a Story specifically to your Close Friends list, while making sure nobody is actually on that list, effectively means no one sees it. It still saves to your archive the same way, and from there it can be added to a Highlight normally. Skip this if you regularly use Close Friends for genuine content, since it’s easy to lose track of which Stories were meant to be private.
Method 3: Post normally, then delete immediately
Post the content as a regular Story, then delete it right away using the three-dot menu and “Delete.” Because Instagram still processes the Story briefly before removal, it typically remains available in your Archive (under your profile’s Activity or Archive section) even after deletion, and can still be pulled into a Highlight from there. This method carries the most risk, since there’s a short window where followers who happen to be actively viewing Stories at that exact moment could see it before it’s deleted.
A note on private accounts
Some workarounds suggest switching your entire account to private temporarily as a way to hide a Story from public view while it archives. This works, but it’s a heavier-handed approach that also hides your grid, bio, and everything else from non-followers during that window, which usually isn’t worth the trade-off for most brands or creators. The hide-from-everyone method (Method 1) achieves the same result with far less disruption.
How to add more stories in a current Highlight
You can add new Stories to an existing Instagram Highlight at any time without creating a new Highlight.
- Go to your Instagram profile and tap the Highlight you want to update.
- Tap the three-dot menu in the bottom-right corner.
- Select Edit Highlight.
- Tap the Stories tab and select the additional Stories you want to add.
- Tap Done to save your changes.
The new Stories will be added to the existing Highlight, keeping all your related content organized in one place.
How to Customize Instagram Highlight Covers
A mismatched, default-thumbnail set of Highlight covers is one of the fastest ways to make an otherwise polished profile look unfinished. A few approaches work well:
Create a Consistent Design Style
Design a consistent set in advance. Tools like Canva have ready-made Instagram Highlight cover templates, letting you build a full set of icons in one sitting that share the same color palette, style, and line weight.
Use Simple and Recognizable Icons
Keep icons simple and legible at a small size. Highlight covers display as tiny circles, so an overly detailed image or busy background often becomes unreadable. Simple line icons or a single bold symbol read far more clearly than a full photo.
Align Covers with Your Brand Colors
Match your existing brand colors. Covers that pull from your logo’s color palette make the entire Highlight row feel like a deliberate design decision rather than an afterthought.
Write Clear Highlight Titles
Label clearly, even with a good icon. The title still matters more than the visual, since that’s what actually tells a visitor what’s inside. Don’t sacrifice clarity for aesthetics.
Instagram Highlight Ideas by Use Case
For businesses: For Instagram Business Reviews or Testimonials, FAQ, How It Works, Shipping & Returns, New Arrivals, Behind the Scenes.
For service providers and coaches: Client Results, Book Now, About Me, Process, Common Questions.
For influencers and creators: Press & Features, Collaborations, Favorite Products, Travel, Q&A.
For restaurants and local businesses: Menu, Hours & Location, Events, Reviews, Specials.
The common thread across all of these: a good Highlight lineup should answer the questions a new visitor is most likely to have, in the order they’d probably want to ask them.
Best Practices for Instagram Highlights
- Keep the number of Highlights manageable. Somewhere between five and eight well-organized Highlights reads as curated. Twenty scattered ones read as clutter.
- Update Highlights periodically. An outdated promotion or an old FAQ answer sitting in a Highlight for a year can actively work against you.
- Put your most important Highlight first. Since highlights appear in a specific order and the leftmost ones are the most visible, lead with whichever collection matters most to a new visitor.
- Use consistent cover art. A unified visual style across all your Highlight covers makes your entire profile look considerably more professional at a glance.
- Refresh underperforming Highlights. If a particular Highlight rarely gets tapped, consider whether its title is unclear or whether the content inside it still resonates with your current audience.
Common Mistakes to Avoid When Creating Instagram Highlights
1. Avoid Using Vague Highlight Names
Too many Highlights with vague names. A Highlight titled “Fun” or “Misc” tells a visitor nothing about what’s inside and rarely gets tapped.
2. Don’t Forget Your Hidden Story Settings
Forgetting to update the hidden-story list. If you use the hide-from-everyone workaround regularly, it’s easy to forget to remove people from that list afterward, quietly limiting who sees your normal Stories going forward.
3. Keep Your Highlight Covers Consistent
Letting covers go stale or mismatched. A profile with three custom icons and five default screenshot thumbnails looks unfinished rather than intentional.
4. Don’t Overload a Single Highlight
Overloading a single Highlight. Instagram caps each Highlight at 100 pieces of content, and Instagram will prompt you to remove the oldest one once you hit that limit, but even well before that ceiling, an overstuffed Highlight becomes tedious to actually scroll through.
5. Review Your Highlights Regularly
Never revisiting old Highlights. Highlights are permanent by default, which means outdated pricing, expired promotions, or old contact information can sit there quietly misleading visitors for months if nobody checks.
Conclusion
Instagram Highlights turn your best, most useful Stories into a permanent, organized front door for your profile, and getting them right is mostly a matter of clear titles, consistent covers, and keeping the content current. The “without posting to your Story” workaround isn’t a built-in Instagram feature, but hiding a Story from your audience before archiving it gets you there reliably enough for most use cases.
Once your Highlights are set up the way you want them, extending that same curated content onto your own website is a natural next step, and it’s one most brands never think to take. If you want to see what that looks like, Tagembed’s free plan lets you embed Instagram content on your website in a few minutes, no code required.
Frequently Asked Questions
Tap the “New” circle under your bio, select Stories from your Archive, give the Highlight a title, choose a cover image, and tap “Add.” It appears on your profile immediately.
Instagram doesn’t offer a direct upload option that skips Stories entirely. The most reliable workaround is posting the content as a Story while temporarily hiding it from everyone in your Story privacy settings, then adding it to a Highlight from your Archive once it’s saved there.
As long as the content was originally posted as a Story (even one that’s expired), it remains in your Archive and can still be added to a new or existing Highlight at any time.
Use the hide-from-everyone or Close Friends privacy method described above. Both let the content save to your Archive without appearing to your regular followers.
Yes. You can select a frame from an included Story, or upload a completely separate custom image, which is the more common approach for brands wanting a cohesive, designed look across all their Highlights.
Up to 100 pieces of content per Highlight. Once you hit that limit, Instagram will prompt you to remove the oldest item if you want to add more.
No. Once added to a Highlight, content stays visible on your profile indefinitely, until you manually remove it or delete the Highlight itself.
Yes, indirectly. Highlights display in the order they were most recently updated, so adding new content to an older Highlight moves it back toward the front of the row.
Story Archive settings need to be turned on for content to save automatically. Check Settings > Privacy > Story to confirm “Save to archive” is enabled, since Stories posted while it was off won’t be recoverable afterward.
Yes, through a social media widget tool. This extends the same curated, evergreen content you’ve built into Highlights beyond Instagram itself, giving website visitors access to the same reviews, FAQs, or behind-the-scenes content without needing to leave your site or follow your account first.
If you can’t add a Story to your Instagram Highlights, it may be because the Story has expired, your Story Archive is turned off, or there is a temporary Instagram app issue. Make sure Save Story to Archive is enabled in your Instagram settings. You can then open your profile, tap New under Highlights, select a Story from your archive, and add it to your Highlight.
Embed social feed from Facebook, YouTube, Instagram, Twitter on your website, like a PRO
Invalid Email Address Multiple Themes